This is the final hidden realm in the original Dungeon Keeper campaign, accessed through the Locate Hidden World box in Level 17, Mirthshire.
The objective of this map is simply to control 2 creatures, Imps not included, and it can be fulfilled by traveling north through the tunnel system and making contact with an unclaimed level 9 Priestess who is milling around in the top-right room of this region.
A timer begins counting down from 2000 at a rate of one point per two Turns, allowing less than four minutes to win. It is possible to reach the end in even less than a minute.
Walkthrough[]
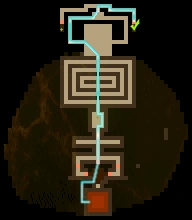 Possible route |
 Boulder safety zone |
You begin with an Imp and a level 4 Skeleton, and the Transfer Creature box hovers right beside your Dungeon Heart in claimed territory. There is an assortment of spells known, and some emergency cash for throwing them.
If you bring a creature in via prior transfer, you have two creatures; you are considered to have satisfied the victory condition and win immediately. It's just that there wasn't much point in coming here in that case.
For the recommended route pictured, start by ordering your Imp to tunnel through the gap in your dungeon and to the lava. Possess the Skeleton and start cruising north.
There are several hazards. First, a plain, 3x4 room up ahead will be loaded with traps; one or two of them might be (erroneously) allied with you, but hug the east wall to avoid the dangerous Lightning Traps. There is no harm in tripping the Alarm Traps lining the room's east wall.
The next areas spring Boulder Traps as the Skeleton moves through intersections. Just run straight through. One Door guards this straight hallway; get in its face to bash it (picture). After this, there will be a large cavern with 7 Boulders that trip when you get in range. Charge and duck into either the right or left-side exits— it does not matter— and proceed to the end of the caverns to save the Priestess.
The only opponents here are four level 2 Archers. They can be ignored entirely and will probably just end up decorating the Boulders.
Reward[]
- The briefing for this map promises that Ug the Barbarian is imprisoned at the end and will become a transferable minion. Bureaucracy being what it is, we gain Ug the Priestess instead.
Either the Priestess or Skeleton can be transferred. In fact, before moving on to the next stage in the campaign, they can be transferred to Secrets 2 or 3 and trained to the maximum. Secret 4 is only in service for Blaise End, Mistle, and Skybird Trill, but the Priestess can be a sleeper hit in these stages.
Through interaction between Wind, Heal, Lightning, and Rebound, a level 10 Priestess is an exceptional lone fighter. The only opponents who give this class of hero trouble are the unusually-fast or Wind-immune melee combatants (such as Horned Reapers, Samurai, and Bile Demons). One-on-one, she can kill any other type of unit in the game up to and including the Avatar, and can handle large groups of some types of opponents.
Messages[]
- Briefing Text
- "This region of the underworld will test your ability to traverse the network of caverns. Indeed, time is your enemy here. Defeat it and you will find where the legendary warrior, Ug the Barbarian is imprisoned. Ug will serve you well in the future."
- Counter at 1000 and level not concluded
- "Half your time has expired."
- Counter at 0 and level not concluded
- "Your time is up. You have failed. I'm embarrassed to come from the same inter-dimensional void as you."
Trivia[]
- The script for this level queerly describes it as a 'Crush the Imp level'.
- For some strange reason, this level is duplicated in the 28 May 1997 prototype under level 122 (it also appears normally under level 103).
Gallery[]
")
")
References[]
- ↑ Prima's Official Guide To Dungeon Keeper Gold Edition. pp. 228,229. Prima Publishing. (1998). ISBN 978-0-7615-1581-4.